Showing posts with label dinner. Show all posts

Friday, 22 April 2022

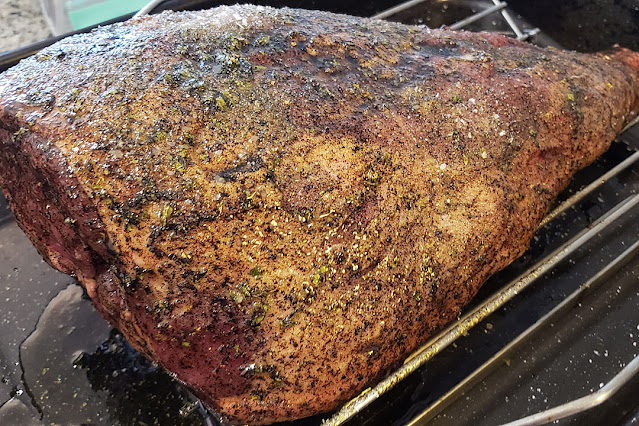
Persian flavoured roast leg of lamb


The spice rub using Persian black limes or loomi and chiles gives this roast lamb a fantastic citrus kick.

Yield: 6-8 servings

Total time: 2-3 hours (You may need to start the day before).


Ingredients:

1 bone-in leg of lamb

4 tbsp black lime chile spice mix

¼ cup of olive oil

2 tbsp salt

2 tsp ground black pepper

1-2 cups chicken broth


For gravy

2/3 cup red wine

2 cups chicken broth

1 ½ tbsp of flour (or 2 tbsp of cake meal if making it for Passover)


Method:

If using frozen lamb, be sure to take it out with enough time to completely defrost (always best the day before).

Take lamb out of the fridge one hour before you want to start cooking. Clean and prepare it, cutting a series of slits all over the meat, which will allow the rub/marinade to penetrate it nicely.

Place the lamb on a rack in a roasting tray.


In a small bowl, combine the spice mix, olive oil, salt, and pepper together to make a wet paste. Using a basting brush, brush the lamb all over with the spicy oil, making sure you get it into those little slits as much as possible.

Leave meat to sit at room temperature and marinate for about an hour. You can cover it with foil but I don’t. (You can do this the night before and wrap it in plastic to marinate and then take it out 30 min before cooking to get to room temperature.)


Just before you’re ready to start cooking, heat the oven to 425F.

Add 1-2 cups of broth to the bottom of the roasting pan and put the meat – uncovered and fat side up – into the oven uncovered for 20 minutes. This gives a nice sear and keeps the roast moist.

Reduce oven temperature to 325F and roast a until a thermometer inserted into thickest part of flesh near the bone reaches 135F (medium-rare) or 140F (medium), 60-90 minutes depending on the size of the roast.  While cooking, continue checking the liquid in the bottom of the pan and add water or broth to make sure it doesn’t dry out.

Remove pan from the oven, remove rack from the pan, and let the roast rest on the rack for at least 15 to 20 minutes, tented with foil. The internal temperature will rise to about 145F-150F.

To make the gravy, take the roasting pan and put it across 2 burners on the stove over medium-high heat. Whisk together the flour and about ½ cup of chicken broth in a glass. Add wine to the drippings in the pan and scrape up all the brown bits from the edge. Add about a cup of chicken broth and stir all together then add the flour/broth mixture. Stir to make sure all the parts are combined and bring to the boil. Let simmer until thickened for about 3-5 minutes. If it’s too thick add a bit of broth or water and if not thick enough let simmer a bit longer. Add any extra juices from the resting lamb and mix together before removing from the heat. Taste and season. Decant into a bowl or gravy boat.

Carve lamb. Serve with delicious gravy. Be thrilled about discovering the wonderful flavour of the black lime. 

Roast potatoes or any other roast veg are a great accompaniment for this dish.


©️ Gail J. Cohen 2022

Friday, 30 October 2020

Chocolate-tinged red enchilada sauce


 This recipe makes a pretty traditional Mexican red enchilada sauce but the addition of some dark chocolate (I used the fantastic organic sea salt chocolate from Canadian chocolate company Xauxa) gives it a little more richness and depth.

Yield: 4 cups

Ingredients:

8 ancho chiles
2 pasilla chiles
3 guajillo chiles
1 medium onion quartered
2 plum or 1 large tomato
3 cloves garlic (skin on)
1/2 tsp Mexican oregano
1/2 tsp marjoram
3 tbsp canola or avocado oil
20 g Xuaxa sea salt dark chocolate, chopped
salt to taste

Method:

Wipe chiles clean and remove stems and seeds. Dry roast them in a hot pan or on a comal (no oil) for about 10 or 15 seconds each side. Don’t let them burn or your sauce will be bitter.  Soak chiles in a bowl of boiled water for about 20 minutes to soften.

Roast the onion, tomatoes, and garlic in the pan or on comal. Let the garlic cool and remove the skin.

Put the soaked chiles, onion, tomatoes, garlic, oregano and marjoram into a blender. (Save the chile soaking water). Blend all of it until smooth, about 3 minutes. It’ll feel like it’s a very long time but your patience will pay off with a silky smooth sauce. If sauce seems too thick add a small amount of the chile soaking water.


Heat two tablespoons of cooking oil in a medium sized pot.  Pour the sauce into the pot to fry it (be careful of potential spitting as the liquid hits the hot oil). Add the chopped chocolate and stir it into the sauce. Reduce the heat and simmer for 30 minutes until the sauce has thickened. It will also turn a deeper shade of red. Check and stir occasionally to make sure it doesn’t stick. The sauce is ready when it coats the back of a spoon.

Add salt to taste.

Allow the sauce to sit for at least 2 hours so that the flavours can marry.

Once your sauce is ready, use it to make your favourite enchiladas rojos. I pretty much guarantee no matter how you choose to make your enchilada that this sauce will be better than most. It will keep in the fridge for about 5 days or freeze it for use anytime.

 © Gail J Cohen 2020


Wednesday, 1 August 2018

Vegan chiles rellenos


I love chiles rellenos and this summer have a bumper crop of poblano peppers growing in my garden so all the more reason to make them. However, they can be a bit heavy and my partner is trying to eat healthier, so I put my mind to figuring out a vegan version.

I also don’t like using “weird” stuff, so there’s no vegan cheese or anything else in here. Just straight up stuff that you’d have in your kitchen to make a vegan picadillo and then stuff the peppers. The batter is a little odd but works and is a bit lighter than the eggy versions that are more traditional.

There are quite a few steps to this dish but they are below, so go for it. I serve it with rice, so remember to have that on the go as well. Some people will stuff the peppers and refrigerate them for an hour and then batter and fry them. If you do it that way, you can make the tomato sauce and batter during that cooling off period.


Serves 2-3

Ingredients:

4 poblano peppers

Picadillo
1 tbsp oil
½ onion, diced
1 carrot, diced
2 cloves garlic, finely chopped
½ cup fresh or frozen corn
1 potato, diced
1 jalapeno, diced
½ tsp Mexican oregano
½ tsp ground cumin
2 tbsp tomato paste
2 tsp tamari
2 cups water
Salt and pepper

Batter
½ cup regular flour
½ cup cornstarch
Pinch of salt
¾ cup soda water

Tomato sauce
1 dried chile (arbol, puya, cascabel, costeno amarillo)
3 tomatoes (or a combo of tomatoes and tomatillos)
1 clove garlic
½ onion
2 tbsp chopped cilantro
Salt and pepper
Splash of oil

Instructions:


Roast the poblanos

If you have a bbq or gas stove, char the skin over the flame. If you have an electric stove, put it under the broiler for 10-15 minutes turning it so all sides get charred. Put the hot peppers in a bowl, cover them with a tea towel, and let them sit/steam for 10 minutes or more. The skin should now come off easily when you rub it. Be careful with this step because you want to keep your peppers in the best shape possible for stuffing. Remove as much of the blackened skin as you can then carefully slice from tip to tail on one side and, again carefully, remove the seeds. Make sure the stem remains attached. Rinse and put aside.


To make the picadillo:

Heat the oil in a medium saucepan. Add onions and saute for a couple of minutes. Add the rest of the vegetables and saute for another minute or two.

Mix tomato paste and water together so you get a tomato juice type situation going on. Add that to the veggies in the pan along with the herbs and tamari (which gives this a bit of a beefier flavour but can be left out if you don’t have any). Bring to the boil, then lower the heat and simmer for about 25 minutes until the carrots and potatoes are soft. You want the final product to be quite dry but if it starts looking like it’s drying out and going to burn before the veg are cook, just add a bit more water. Check the seasonings and then put aside to cool.

For tomato sauce:

Stem and seed the chile and then soak in a bit of boiling water for 15 minutes.

Roughly chop all the other vegetables. Chuck them in a blender along with the softened chile and a couple of tablespoons of the soaking water. Waz it all up until smooth, about 2 minutes.

Heat the oil in a small pot. Pour in the sauce. You should get a lovely sizzle so just watch you don’t get burned. Add salt and pepper. Turn the heat down and simmer for 10 minutes. The sauce will turn a darker red colour. Taste again for seasoning.


Batter up

Make the batter by simply adding the flour, cornstarch, salt, and soda water and whisking it all together.

Stuff it

At this point, you’re going to stuff the peppers, which is a bit of a fiddly business. Just be patient and have some toothpicks on hand to help seal the stuffed peppers.


Take a split pepper and place in the palm of your one hand. Gently fill with 2 tbsps or so of the picadillo (depending on the size of your peppers, you may need more or less). Make sure they are not too full to allow you to pull the two sides together and seal with a toothpick or two. Repeat for each of the poblanos.

In a medium sized frying pan, add enough oil to generously cover the bottom of the pan and heat.


Gently dip each of the chiles in the batter and place slowly into the hot oil. Cook for 3-4 minutes on each side or until the batter gets lightly golden brown. If the batter doesn’t stick as much as you’d like, you can spoon a little bit more on the chiles while they’re cooking.

Once they’re all golden brown, remove to a bit of paper towel to absorb a bit of the oil. Serve over a bed of rice with the tomato sauce.


Buen provecho.

© Gail J Cohen 2018

Saturday, 14 April 2018

Beet and sweet potato soup


This is a hearty vegan soup that has a little warm heat from the delicate Kashmiri chile.  I love beets and this seemed like a great way to use them and sweet potatoes, which I’d also like use in more dishes.  And pink soup, woo hoo!

6 servings

Ingredients:

4 small beets
2-3 small sweet potatoes
1 onion
1 tsp whole cumin
1 tsp whole coriander
1 green cardamom pod
1” piece of ginger
4 cups veggie stock
1 tsp Kashmiri chile
4 tbsp oil
Salt


Peel the beets and sweet potatoes and cut into smallish pieces. There are two ways you can prepare them to get a deeper and richer flavour. One is to roast them in the oven: Heat oven to 375F. Sprinkle veg with oil and a tiny bit of salt. Wrap in a foil package and then roast for about 45 minutes.  

The second is to saute them in oil for a bit in a frying pan so they get a bit caramelized and soft around the edges, which takes about 15 minutes.


In the meantime, take the cumin, coriander, and seeds from the cardamom pod and grind them in a mortar & pestle or spice grinder. The flavours are best when freshly ground but you can always use already ground spices.  Finely chop or grate the ginger.


Dice the onion. Add 2 tbsp of oil to a medium sized pot and sautee the onions with a pinch of salt until just starting to brown. Then add the ground spices, ginger, and chile and fry for just a minute.

Add the veggie stock and roasted vegetables. Bring to the boil. Then lower the heat and simmer for about half an hour until the vegetables are soft. 

Remove from heat and blend until quite smooth. Adjust the seasoning. Serve with a small dollop of sour cream or cashew cream.

© Gail J Cohen 2018

Sunday, 14 January 2018

Stuffed zucchini


This recipe is a bit of a variation on stuffed zucchini that my mom has made since I was a little kid. I love potatoes and think that little cubes of it are fantastic in this rich and lemony tomato sauce, so I added them and the mint and chile flakes to zip it up a bit.

You can make this dish vegan by skipping the ground beef and using more rice and more of the zucchini innards for your stuffing. You an also add some slices of eggplant to the sauce to give it more texture. (Be sure to salt them first).

Serves 4

Ingredients

4 fat zukes
1 onion, finely chopped
1 tbsp tomato paste
2 tomatoes, sliced thickly
1 cup passata
250 g ground beef
3 tbsp chopped parsley
1/3 cup cooked rice
4 cloves garlic, finely chopped
2 potatoes, cut into small cubes
2 tbsp chopped fresh mint
Pinch of chile flakes
Juice of half a lemon
4 tbsp olive oil
Salt and pepper


Carefully cut the zukes in half and scoop out the inside. Be careful to get as much of the flesh as you can but not to make any holes in the skin. Roughly chop and then reserve the pulp. Put the zukes aside.

To prepare the filling, heat 2 tbsp of olive oil in a medium-sized frying pan. Add half the onions and sautee for a few minutes until they start to turn brown. Add half the garlic and sautee for another minute.


Add the ground beef to the pan and brown. Add the tomato paste, about 1/3 of the chopped zucchini pulp, rice, mint, parsley, chile flakes, salt and pepper. Then add about 1/3 cup of water so your tomato paste has enough liquid to mix well into the other ingredients. Cook the whole mixture for about 10-12 minutes until it’s just cooked.  Put aside to cool.

In a large, flat-bottom oven-proof pot (it needs to be big enough to lay out your zukes as well as go in the oven), heat up the remainder of the olive oil. Sautee onions and garlic as above.


Turn the heat down to med-low. Carefully add the passata so you don’t get splattered. Lay the tomato slices (and eggplant if you're using it) on the bottom of the pot, add the rest of the chopped zucchini pulp, lemon juice, potato cubes, salt, and pepper. Bring to the boil.

In the meantime, take the cooled filling and carefully spoon it into the zucchini shells.


Place the stuffed zukes on top of the vegetable mixture in the pot and reduce the temperature to low.Simmer covered for about 20 minutes.

Pre-heat the oven to 350F.  After 20 minutes, turn off the burner and remove the cover from the pot. Put the pot in the oven uncovered to cook for about another 20 minutes. 
When it's ready, the dish should be a bit brown on top, and the veggies (particularly the potaotoes) all soft. Depending on the water content of the zukes, you may want to remove them from the sauce and boil it down for a thicker sauce or just serve it as is.

Serve with rice, smothered in the rich cooking sauce. Add salt and pepper to taste.


© Gail J. Cohen 2018

Monday, 25 September 2017

Vegan basil hemp pesto


I've been cooking but not writing about it much lately. Trying to get back on track. The fall harvest is a great time to do it! Here's one for the gardeners (and the vegans).

If you're like me, you tend to grow basil in your garden in the summer and there's only so much of it you can use before the frost get it. Pesto is one of the greatest ways to use up large amounts of the fresh stuff. And making it takes hardly any time at all.


And this recipe mixes it with one of my favourite (and local!) seeds: hemp, which have an extraordinary nutty flavour that is enhanced by toasting the seeds before making the mixture. Add a little hemp oil to ratchet up that nuttiness. The fresh parsley, which is likely also in your garden, adds a bit of herby lightness.

Yield:  1.5 cups

Ingredients

1/2 cup hemp seeds
3 loosely packed cups of fresh basil leaves
1 sprig fresh Italian parsley
2 cloves of garlic, peeled and sliced
1/3 cup extra virgin olive oil
3 tbsp cold pressed hemp oil
2 tbsp nutritional yeast
1/2 tsp salt
fresh ground pepper


Toast the hemp seeds in a non-stick pan on medium heat. It will seem like it takes a while but keep your eyes on it at all times because the seeds will go from not toasted to burnt in about 30 seconds. The toasting shouldn't take more than about 5-6 minutes depending on the pan you're using. Cool before making the pesto.


Clean the basil and parsley, making sure it's mostly dry before continuing on.

Add all the ingredients into a food processor. Blend for about a minute making sure the garlic is all chopped and it is quite smooth and creamy. Check the seasonings and voila. 

Use it on pasta, add cream/cream substitute if you want to make a creamy sauce, use it dressing for salads, etc.  It'll keep in the fridge for about a week but you can also freeze it in ice cube trays and save it for later when you're yearning for some garden freshness in the middle of winter.

© Gail J. Cohen 2017

Monday, 2 January 2017

Let's cook (and eat) together


There really are few things in the world that give me more pleasure than cooking and sharing interesting and delicious food with friends. A couple of years ago, I decided to host a dinner party at least once a month. It worked out fabulously and gave me the opportunity to cook some great stuff and connect with lots of friends. The only downside: lots of cleaning up.

A few months ago, someone mentioned the idea of a cookbook club, so I checked it out and thought it would be a great way to once again indulge in my love of cooking and sharing the table with friends, new and old. As you can see from the picture above, there's a lot of cookbooks in this house (most of them belong to my partner and this isn't even all of them....) 

So, for 2017, I am launching a cookbook club. 

The first rule of cookbook club is: Everybody cooks and everybody eats.

My plan is to have us meet once every couple of months. Pick a cookbook to discuss and make recipes out of. Then have a potluck type together and hang out and eat and drink. 

If you live in Toronto, especially the east end, and you're interested, leave a comment or find me on Instagram @ohcanadagail. Hoping to launch later this month or early February.

Thursday, 15 December 2016

4 chile chili

Chiles: chipotle, guajillo, ancho, pasilla
It’s winter time, comfort food time. And if you’re me and have a cupboard full of chiles, what else is there to do but make chili. So here’s one that’s a bit different than the usual. I can’t eat beans which is what most people put into their ground beef chili. Texas-style chili is often iade with big chunks of beef. I’m taking a middle road by using stewing beef cut up into really small pieces.

If you can’t find dried chipotles, you can always use canned ones. The chiles in this recipe are now fairly widely available either in local latin grocery store or most higher end chain grocery stores. It’s about a 6/10 on the heat scale.

Yield: 4 servings

Ingredients:

1 chile ancho
1 pasilla chile
2 chipotle chiles
1 guajillo chile
4 garlic cloves
1 small onion
2 tomatoes
1 tsp mexican oregano
2 whole cloves
1/4 tsp ground cumin
1/8 tsp ground coriander seeds
1/4 tsp ground black pepper
1/4 cup beef stock
1 tbsp olive oil
1 pound stewing beef, cubed very small
1 heaping tsp sugar
1-1/2 tsp salt

Stem and seed the dried chiles, splitting them in half so you can flatten them. Heat up a comal or a non-stick frying pan and dry roast the chiles in the pan. Heat them for about 20 seconds on each side, flattening with a spatula, so they get soft. Be very careful not to blacken the skin otherwise your sauce will be bitter.  Place the roasted chiles in a small bowl
of boiling water for 20 minutes so they can rehydrate.


Thickly slice your onion and place it and the garlic cloves with their skin on in the pan or on the comal and dry roast them until they are nicely blackened. The garlic will get all soft and sweet. Remove from the heat and let cool then peel and put into the jar of a blender along with the onion, cut up tomatoes, oregano, spices, beef stock, softened chiles and about 1/2 of a cup of the chile soaking water (do not throw the soaking water away yet!).


Blend it all together for 2-3 minutes to ensure you have a smooth but not very thick paste.

Heat the oil in a medium sized pot and brown the meat.


Turn the pot back up to hot and add a bit more oil, then pour in the chile mixture. You should get a nice sear. Bring to the boil. You’ll need to add up to a cup more of liquid – water, stock, or chile soaking liquid (which will make it spicier) – so there’s sufficient liquid to simmer. Add sugar (to take away any bitterness) and salt. 

Bring to the boil, turn heat down to low, and simmer partially covered for an hour, checking frequently to make sure there’s still enough simmering liquid. Add more if it’s getting too dry, it should be saucy but not soupy.


Serve in bowls with tortillas or rice, some slices of avocado and sour cream. I ended up making some cheesy grits and it was super delish together. The chili is  lovely if made a day ahead so all the flavours have a chance to meld together. It’s easy enough to reheat just before serving.

© 2016 Gail J. Cohen

Friday, 7 October 2016

Roast duck tacos

Sometimes you just need a break from chicken and duck is a great alternative. Not to mention, these are an excellent option for using leftover duck that you may have made for Thanksgiving or some other special occasion that had you experimenting with non-turkey options.

If you’re starting from scratch, this dish does take a while but it’s totally worth it. If you are using a frozen duck, which are available in most grocery stores, make sure it is completely defrosted before you start. You can use the first part of the recipe simply to make a delectable, spicy roast duck or you can go all the way and serve up some unusual tacos to a tableful of lucky dinner guests.

I have set up the recipe with the instructions for the roast duck first, followed by the one for the salsa, which stars my personal favourite poblano peppers.


Yield: 4-8 servings

Ingredients:

1 whole duck
2 tsp chipotle powder
1 tsp salt
pinch of black pepper

Sauce:
2 poblanos
2 tomatillos, husked and rinsed
2 serrano peppers
1 large tomato
2 garlic cloves
1/2 onion, thickly sliced
2 tbsp chopped fresh cilantro
1/2 tsp salt
Juice of half a lime

Garnish:
Chopped radishes
Chopped cilantro
Sliced or mashed avocado
Chopped tomatoes
Lime wedges

Corn tortillas

Roasting the duck

Preheat the oven to 450F

Clean the duck – ie: remove all the giblets, cut off excess fat etc. and rinse.  Prick the skin in all over and then gently put the duck in a large pot of boiling water for about 10 minutes. This action will give you super crispy skin down the road. Totally worth doing it even though you don’t need to. After 10 minutes, remove the duck from the pot and let cool.


Mix the chipotle powder, salt, and black pepper in a small bowl. Once the duck is cool, rub seasoning mix inside and out.  Place the seasoned bird breast up on a rack in a roasting pan and cook in the oven for 15 minutes. After that, turn the oven down to 350F and cook for another 40 minutes.


At this point, take the duck out of the oven and carefully turn it over so you don’t tear the skin. Also add about a 1/4 cup of water to the fat and drippings that have collected in the bottom of the pan. Return the duck to the oven for another 35 minutes. After that turn the bird one more time and cook for about another 15 minutes. It’s ready when the drumsticks feel loose. Don’t overcook though because it will be dry, rubbery, and stringy. Remove from the oven.

This duck is now spicy and delicious with some awesome crispy skin. Be sure to save the duck fat and juices that have collected in the bottom of the pan.


One duck provides enough meat for 6 to 8 people to have a large meal of off-the-charts duck tacos. So usually for four, I use half the duck and save the other half for other meals. Conversely, you can eat the fresh roasted duck right away because it is hot and delectable and then use the leftovers for tacos.

Once you make the decision on how to proceed with consuming this bird, let the portion for tacos cool then remove the skin and shred the meat into a bowl.


Making the salsa

While the duck is cooking, you can prepare the salsa. Start by roasting the poblano peppers. If you have a bbq or gas stove, char the skin over the flame. In this case, it’s a bit more complicated if you have to use the oven. You can either wait until the duck is cooked or put them under the broiler beforehand for 10-15 minutes, turning so all sides get charred.

Put the hot peppers in a bowl, cover them with a tea towel, and let them sit/steam for 10 minutes or more. The skin should now come off easily when you rub it. Remove as much of the skin as you can then cut out the stem and seed. Rinse them to get all the black stuff off and remove the final few stubborn seeds. Cut them up into a few large pieces and put into a blender jar.

On a comal or in a large non-stick frying pan, dry roast the garlic (leave it whole with the skin on), slices of onion, tomatillos, and tomatoes. All the vegetables should be nicely charred with the tomatoes and tomatillos just starting to ooze some juice. Put all but the garlic into the blender. Let the soft, blackened garlic cool then peel and chuck in the blender. Add the cilantro, salt, and lime juice and blend for about a minute.

In a small saucepan, pour two or three tablespoons of the duck fat/dripping mixture. When hot pour in the salsa mixture. You will get a tremendously satisfying sizzle from this operation!  Turn the heat down and let it slowly bubble away for 10 minutes or so until it turns a deeper shade of green. Check the seasonings.

Now let’s make some tacos

Warm the tortillas in the microwave either in a paper towel or tortilla warmer.

Fill them up with the shredded duck, a couple of spoonfuls of the salsa, and the garnish of your choice.  Serve with lime wedges. Enjoy!


© 2016 Gail J. Cohen

Friday, 9 September 2016

What to cook with your tomato harvest II: Tomato tart


With the abundance of tomatoes from the garden, I had been threatening to make this for weeks. It’s a great way to use up a bunch of the cherry or grape tomatoes in your garden, particulary because when it rains it pours with the little ones. I used smoked gouda because I really enjoy the smoky flavour and feel it pairs really well the tomatoes. It’s also a pretty fast weekday recipe and served with a salad makes a nice light lunch or dinner.

Yield: 2-3 servings

Ingredients

1 tart shell recipe or 1 frozen pie shell

2 dozen heirloom cherry or grape tomatoes, halved
2 tbsp dijon mustard
1 tbsp chopped fresh herbs – chives, basil, thyme
pinch of salt
100 g smoked gouda, grated

Once you’ve cut the tomatoes in half, place them innards up on a cutting board and cover them with a paper towel or two to remove some of the liquid. Leave it for about 10 minutes or so, then simply discard the paper towels.

Preheat your oven to 325 F

I used the frozen pie shell because it makes this whole operation faster and with less cleanup. Plus I don’t enjoy fiddling with making crust. But if you choose to make crust, here is an easy recipe from BBC Good Food [http://www.bbcgoodfood.com/recipes/2983/basic-shortcrust-pastry].

If using frozen, make sure to take it out at least a half an hour before you need to start using it. Follow the instructions for the pastry if you’re making it or remove the defrosted shell from the foil pan it’s in and place pastry in a tart pan (the one with the bottom that comes out). If you’re feeling adventurous, you can free form your pastry and make it look rustic.


Either way, once your pastry is ready, spread the dijon mustard all over it. It should be about the same thickness as you use on a sandwich so use a bit more or less than above if necessary. The lay the tomato halves on the pastry alternating them so some are skin up and some are insides up.  Sprinkle the fresh herbs and a bit of salt on the tart and finish off with a layer of the grated cheese.


Place in the oven. Cook for 20-30 minutes until the cheese and crust are browned and the tomatoes have given off most of their liquid. Remove from the oven and let stand for a few minutes, then slice and serve!


Tuesday, 30 August 2016

You can't beet this curry

I used to live right in downtown Toronto and just down the street in Cabbagetown was an unassuming Sri Lankan restaurant in a somewhat ramshackle old house. I can’t remember how I first ended up eating at Rashnaa there but I do remember that it was a taste revelation for me and I have probably eaten there more than anywhere else in the city. Most of the time I would order the mutton kottu roti, which is a spicy, meaty, plate of wonderousness. When something is that good, why stray, but at some point I started ordering a side of one of their vegetable curries. Now they have a lot of the standard ones but they also have a few special ones that they don’t make every day, so it’s a bit of a lottery if they’re going to have them on the day you decide to eat there.

My three favourites are beet, spinach, and okra. None of which are easy to replicate. I have scoured the internet for recipes for all of them and tried a few but not had the best luck. This is the closest I’ve come to Rashnaa’s beet curry and is adapted from a recipe at My New Roots. Joy factor also ratched up as the beets came out of my own garden.


One of the things that I really like is the flavour of curry leaves, which are an aromatic leaf from a citrusy tree and are completely unrelated to curry powder. They are incredibly fragrant, and not at all spicy, giving off a nutty scent when cooked. They apparently also have tremendous health benefits. You can buy curry leaves fresh and dried in most Indian and even some regular grocery stores.

Yield: 3-4 servings

Ingredients

2 – 3 medium-sized beets
1 tbsp coconut oil
1 tsp black mustard seeds
1 tsp ground coriander
20 dried or 15 fresh curry leaves
2 green chiles, finely chopped
1 stick cinnamon
1 large onion, finely chopped
3 cloves garlic, chopped
1 tsp. salt, plus more for finishing
1 cup full-fat coconut milk
juice of 1 lime
1/4 cup chopped cilantro


Peel beets and cut them into matchsticks. You might want to wear gloves for this to avoid getting bright pink hands.

In a medium-sized pot over medium-high heat, melt coconut oil. Add the mustard seeds, stirring constantly until they start to pop. Quickly add the coriander, curry leaves, chiles, and cinnamon, stir well, and fry for a minute.

Add the onion and saute until they are translucent, about 5 minutes. Add garlic and saute for another minute.

Add beets, salt, and coconut milk, bring to a simmer, reduce heat low and cover. Simmer gently so the coconut milk doesn’t split, for about 20 minutes until the beets are fork tender.

Once the beets are done, turn off the heat and stir in the lime juice. Check your salt levels and then gently fold in the cilantro.

Serve hot with rice and any other vegetable curries you might like.


The beautiful beet curry along with a chicken in onion gravy, smoked eggplant and herbs, and a mushroom curry.

Thursday, 18 August 2016

Boerie burgers: when sausage just ain't right

Hands down, if I have the choice for sausage, it’ll always be South African boerwors. Problem is that it’s often hard to find – although if you’re in the Toronto area, Oakville-based Florence Meats does the best one around, no question – and sausages are not the easiest to make, so we don’t eat it all that often.

On a recent trip to South Africa, I tried to eat boerwors at every opportunity but I’m not gonna lie, I was often let down. But . . . then there was McDonald’s. Laugh all you want but each country always has some local speciality and it just so happened that when we were there it was boerie burgers. So of course we had to have them and they turned out to surprisingly be the best boerwors of that particular trip.

As it’s now summer in the northern hemisphere, grilling on the bbq is where it’s at, and regular old hamburgers can sometimes get a bit boring. So I thought why not give it a try with the boerie burger. The thing is that the spice mixture is what it’s all about so if you don’t get it right, they aren’t going to be good. Here’s my first kick at the can. It's pretty good but can always stand a bit of refining.


Yield; 4 servings

Ingredients:

1 pound lean ground beef
1/4 cup of breadcrumbs
2 tbsp red wine vinegar
3 tbsp water
¾ teaspoon salt
2 teaspoons ground coriander
½ teaspoon ground allspice
1/2 tsp ground cumin
2 ground cloves
1/2 tsp sugar
pinch of ground nutmeg
⅛ teaspoon black pepper


I start off mostly with whole spices and just put them all in a mortar and pestle and grind them so the flavours are the freshest. A coffee grinder also works well and gets the grind very fine.

Mix the breadcrumbs, water, and vinegar together in a bowl. Add the spices and meat and gently combine. Form into patties (whatever size makes you happy. I prefer to have slightly larger, flatter patties because they often shrink on the grill).

Heat your grill to sizzling, then turn down to medium and grill for 4 minutes or so a side for med-large patties. Serve as you would any burger (sauteed onion are grand with it - but no cheese please). However, if you really want to get that South African feeling, whip up some monkey gland sauce (no monkey involved) to top them off.

© Gail J. Cohen 2016