Showing posts with label cooking. Show all posts

Monday, 10 August 2020

Tamales de mole amarillo

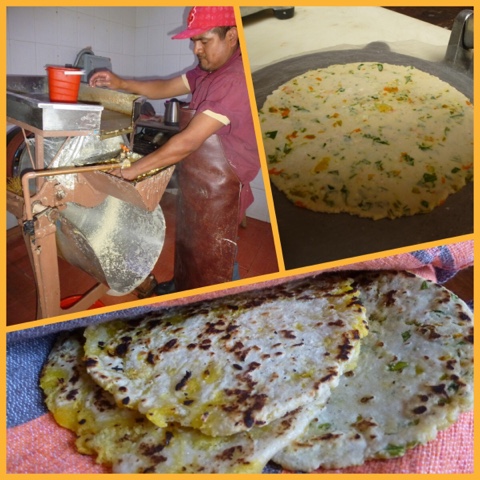
Mole amarillo is one of the most popular fillings for tamales, the best late-night treats available on the streets of Oaxaca, Mexico. This is my version created from the many different ones that I was shown and read about how to make. I use costeno amarillo chiles but unless you’ve got a stash that you picked up while in Oaxaca, you won’t have them. Substitute guajillos instead. The sauce will be a little more red/orange than yellowish in that case. There’s also some alternate vegetarian filling suggestions at the end.

These tamales are wrapped in banana leaves, which are available frozen in many Latin, Asian, and Indian grocery stores. I also use shortening rather than lard but if you are all about the lard, go ahead and use that for your masa. And if you don’t have comal, you can dry roast everything in a non-stick frying pan.

Makes 20-24 tamales

Ingredients:

Mole

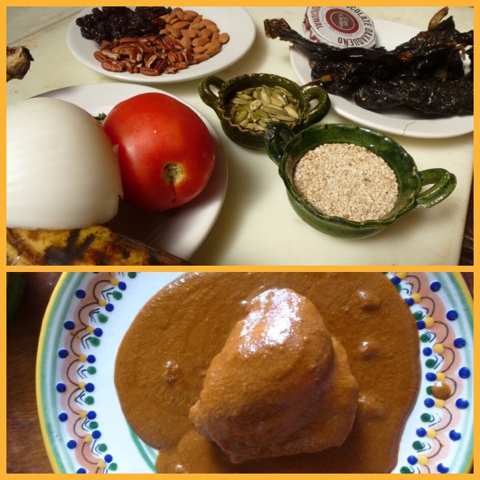
4 chiles costeno amarillo
2 large plum tomatoes
½ small white onion, sliced
2 garlic cloves
2 med or 4 small tomatillos
2 cloves
Pinch of ground cinnamon
Pinch of cumin
1 ball of allspice
6 peppercorns
1 tsp oregano (preferably Mexican)
2 tbsp chopped fresh cilantro
1/3 cup masa harina
2 cups chicken stock (use the water you poached your chicken in)
2 tbsp olive oil
Salt to taste

Chicken for filling

8-10 chicken thighs
Handful of fresh parsley
1 clove of garlic
8 peppercorns
1 tsp salt

Masa for tamales

1 cup shortening
2 cups masa for tamales (store bought, dried)
1 tsp baking powder
1 tsp salt
1.5 cups warm chicken stock

1 pkg frozen banana leaves (defrosted)

Method:

  1. Poach the chicken: Put chicken into a pot with parsley, garlic, salt, and peppercorns. Cover with water and poach chicken until done. Save stock to use in making mole. Set chicken aside to cool.
  2. Remove stem and seeds from the chiles. Gently soften the chiles on the comal. Remove and place in a glass bowl and cover with boiling water. Let soak for at least 20 minutes.
  3. Dry roast onion slices, garlic in the skin, tomatoes, tomatillos on the comal.
    Once ready put them all in the blender (remember to cool and remove the skin from the garlic). Add the cilantro, oregano, and chiles with some of their soaking liquid. Waz until smooth, about 3-4 minutes.
  4. Grind the cloves, cumin, allspice, and pepper.
  5. Heat oil in a small pot and quickly fry spices, including cinnamon, when hot. Add chile mixture and sear.  Bring to the boil and stir for about 5 minutes. Add masa harina as well as ½ a cup or so of chicken stock. Let boil for about 10 minutes. Add more stock if it’s too thick and let boil for a total of 15-20 minutes. Add salt to taste.
  6. Shred the cooked chicken. Mix the shredded chicken and most of the mole together to make the tamale filling. It should be wet but not too runny. Add a little more of the mole and/or chicken broth until it is a good consistency.
  7. The package of masa you have should have instructions on how to make the dough, so it’s best to follow those.  Basically mix all the dry ingredients together in a bowl, then add the chicken stock and incorporate. It should create quite a damp (but not at all runny) dough. Beat the shortening in a stand mixer or with a hand mixer until it is quite fluffy, about 3-5 minutes. Then add the masa to the shortening and beat until mixed together, about another 2-3 minutes. You can test to see if it’s fluffy enough by putting a small ball into a glass of water. If it floats, you’re good to go!
  8. Put a layer of water about 5 cm/2” deep into a steamer pot or the largest pot you have in the house with a veg steamer tray in the bottom. The great thing about banana leaf tamales is you can just pile them one on top of another, unlike corn husk ones that need to be standing upright.
  9. Wipe down the leaves and trim them with a scissors: cut off the stem and make squares approx. 20 cm/8” (they don’t need to be perfect). You should also cut them with the grain of the leaf rather than against it. Either cut some thin strings from the banana leaf or use cooking twine for wrapping up the parcels. 
  10. Once your leaves are all prepared, pass them over a flame or grill, moving them constantly, until they soften and become pliable. The banana leaves have a white film on them. The heat should burn off the white film and make the leaves shinier. 
  11. Place ¼ cup of masa onto each banana leaf and flatten (this works best with a rubber spatula). Put about 2 tbsp of filling on to the top half of the masa (not in the middle). Fold the leaf so the lower part masa covers the filling.
    You may have to roll or fold it again to close the packet up tightish. Then fold the sides of the banana leaf one at a time to form a package. Tie with string and place folded side down into the pot on the steamer tray. Pile them up neatly around the pot as you go.
    Once you have all them all wrapped and ready, cover the pot and turn on the burner to get the water boiling. Once boiling, turn down to low and let your tamales steam for about 45 minutes.

  12. When done, remove from pot and let cool for about 10 minutes before serving. Top with a bit of salsa verde.
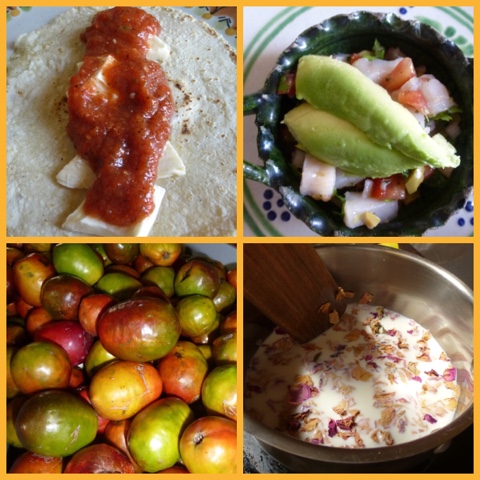

* Vegetarian fillings:

Oaxacan cheese and rajas (slices of jalapeno or roasted poblano)
Oaxacan cheese and refried beans


Sunday, 14 January 2018

Stuffed zucchini


This recipe is a bit of a variation on stuffed zucchini that my mom has made since I was a little kid. I love potatoes and think that little cubes of it are fantastic in this rich and lemony tomato sauce, so I added them and the mint and chile flakes to zip it up a bit.

You can make this dish vegan by skipping the ground beef and using more rice and more of the zucchini innards for your stuffing. You an also add some slices of eggplant to the sauce to give it more texture. (Be sure to salt them first).

Serves 4

Ingredients

4 fat zukes
1 onion, finely chopped
1 tbsp tomato paste
2 tomatoes, sliced thickly
1 cup passata
250 g ground beef
3 tbsp chopped parsley
1/3 cup cooked rice
4 cloves garlic, finely chopped
2 potatoes, cut into small cubes
2 tbsp chopped fresh mint
Pinch of chile flakes
Juice of half a lemon
4 tbsp olive oil
Salt and pepper


Carefully cut the zukes in half and scoop out the inside. Be careful to get as much of the flesh as you can but not to make any holes in the skin. Roughly chop and then reserve the pulp. Put the zukes aside.

To prepare the filling, heat 2 tbsp of olive oil in a medium-sized frying pan. Add half the onions and sautee for a few minutes until they start to turn brown. Add half the garlic and sautee for another minute.


Add the ground beef to the pan and brown. Add the tomato paste, about 1/3 of the chopped zucchini pulp, rice, mint, parsley, chile flakes, salt and pepper. Then add about 1/3 cup of water so your tomato paste has enough liquid to mix well into the other ingredients. Cook the whole mixture for about 10-12 minutes until it’s just cooked.  Put aside to cool.

In a large, flat-bottom oven-proof pot (it needs to be big enough to lay out your zukes as well as go in the oven), heat up the remainder of the olive oil. Sautee onions and garlic as above.


Turn the heat down to med-low. Carefully add the passata so you don’t get splattered. Lay the tomato slices (and eggplant if you're using it) on the bottom of the pot, add the rest of the chopped zucchini pulp, lemon juice, potato cubes, salt, and pepper. Bring to the boil.

In the meantime, take the cooled filling and carefully spoon it into the zucchini shells.


Place the stuffed zukes on top of the vegetable mixture in the pot and reduce the temperature to low.Simmer covered for about 20 minutes.

Pre-heat the oven to 350F.  After 20 minutes, turn off the burner and remove the cover from the pot. Put the pot in the oven uncovered to cook for about another 20 minutes. 
When it's ready, the dish should be a bit brown on top, and the veggies (particularly the potaotoes) all soft. Depending on the water content of the zukes, you may want to remove them from the sauce and boil it down for a thicker sauce or just serve it as is.

Serve with rice, smothered in the rich cooking sauce. Add salt and pepper to taste.


© Gail J. Cohen 2018

Monday, 2 January 2017

Let's cook (and eat) together


There really are few things in the world that give me more pleasure than cooking and sharing interesting and delicious food with friends. A couple of years ago, I decided to host a dinner party at least once a month. It worked out fabulously and gave me the opportunity to cook some great stuff and connect with lots of friends. The only downside: lots of cleaning up.

A few months ago, someone mentioned the idea of a cookbook club, so I checked it out and thought it would be a great way to once again indulge in my love of cooking and sharing the table with friends, new and old. As you can see from the picture above, there's a lot of cookbooks in this house (most of them belong to my partner and this isn't even all of them....) 

So, for 2017, I am launching a cookbook club. 

The first rule of cookbook club is: Everybody cooks and everybody eats.

My plan is to have us meet once every couple of months. Pick a cookbook to discuss and make recipes out of. Then have a potluck type together and hang out and eat and drink. 

If you live in Toronto, especially the east end, and you're interested, leave a comment or find me on Instagram @ohcanadagail. Hoping to launch later this month or early February.

Friday, 7 October 2016

Roast duck tacos

Sometimes you just need a break from chicken and duck is a great alternative. Not to mention, these are an excellent option for using leftover duck that you may have made for Thanksgiving or some other special occasion that had you experimenting with non-turkey options.

If you’re starting from scratch, this dish does take a while but it’s totally worth it. If you are using a frozen duck, which are available in most grocery stores, make sure it is completely defrosted before you start. You can use the first part of the recipe simply to make a delectable, spicy roast duck or you can go all the way and serve up some unusual tacos to a tableful of lucky dinner guests.

I have set up the recipe with the instructions for the roast duck first, followed by the one for the salsa, which stars my personal favourite poblano peppers.


Yield: 4-8 servings

Ingredients:

1 whole duck
2 tsp chipotle powder
1 tsp salt
pinch of black pepper

Sauce:
2 poblanos
2 tomatillos, husked and rinsed
2 serrano peppers
1 large tomato
2 garlic cloves
1/2 onion, thickly sliced
2 tbsp chopped fresh cilantro
1/2 tsp salt
Juice of half a lime

Garnish:
Chopped radishes
Chopped cilantro
Sliced or mashed avocado
Chopped tomatoes
Lime wedges

Corn tortillas

Roasting the duck

Preheat the oven to 450F

Clean the duck – ie: remove all the giblets, cut off excess fat etc. and rinse.  Prick the skin in all over and then gently put the duck in a large pot of boiling water for about 10 minutes. This action will give you super crispy skin down the road. Totally worth doing it even though you don’t need to. After 10 minutes, remove the duck from the pot and let cool.


Mix the chipotle powder, salt, and black pepper in a small bowl. Once the duck is cool, rub seasoning mix inside and out.  Place the seasoned bird breast up on a rack in a roasting pan and cook in the oven for 15 minutes. After that, turn the oven down to 350F and cook for another 40 minutes.


At this point, take the duck out of the oven and carefully turn it over so you don’t tear the skin. Also add about a 1/4 cup of water to the fat and drippings that have collected in the bottom of the pan. Return the duck to the oven for another 35 minutes. After that turn the bird one more time and cook for about another 15 minutes. It’s ready when the drumsticks feel loose. Don’t overcook though because it will be dry, rubbery, and stringy. Remove from the oven.

This duck is now spicy and delicious with some awesome crispy skin. Be sure to save the duck fat and juices that have collected in the bottom of the pan.


One duck provides enough meat for 6 to 8 people to have a large meal of off-the-charts duck tacos. So usually for four, I use half the duck and save the other half for other meals. Conversely, you can eat the fresh roasted duck right away because it is hot and delectable and then use the leftovers for tacos.

Once you make the decision on how to proceed with consuming this bird, let the portion for tacos cool then remove the skin and shred the meat into a bowl.


Making the salsa

While the duck is cooking, you can prepare the salsa. Start by roasting the poblano peppers. If you have a bbq or gas stove, char the skin over the flame. In this case, it’s a bit more complicated if you have to use the oven. You can either wait until the duck is cooked or put them under the broiler beforehand for 10-15 minutes, turning so all sides get charred.

Put the hot peppers in a bowl, cover them with a tea towel, and let them sit/steam for 10 minutes or more. The skin should now come off easily when you rub it. Remove as much of the skin as you can then cut out the stem and seed. Rinse them to get all the black stuff off and remove the final few stubborn seeds. Cut them up into a few large pieces and put into a blender jar.

On a comal or in a large non-stick frying pan, dry roast the garlic (leave it whole with the skin on), slices of onion, tomatillos, and tomatoes. All the vegetables should be nicely charred with the tomatoes and tomatillos just starting to ooze some juice. Put all but the garlic into the blender. Let the soft, blackened garlic cool then peel and chuck in the blender. Add the cilantro, salt, and lime juice and blend for about a minute.

In a small saucepan, pour two or three tablespoons of the duck fat/dripping mixture. When hot pour in the salsa mixture. You will get a tremendously satisfying sizzle from this operation!  Turn the heat down and let it slowly bubble away for 10 minutes or so until it turns a deeper shade of green. Check the seasonings.

Now let’s make some tacos

Warm the tortillas in the microwave either in a paper towel or tortilla warmer.

Fill them up with the shredded duck, a couple of spoonfuls of the salsa, and the garnish of your choice.  Serve with lime wedges. Enjoy!


© 2016 Gail J. Cohen

Tuesday, 30 August 2016

You can't beet this curry

I used to live right in downtown Toronto and just down the street in Cabbagetown was an unassuming Sri Lankan restaurant in a somewhat ramshackle old house. I can’t remember how I first ended up eating at Rashnaa there but I do remember that it was a taste revelation for me and I have probably eaten there more than anywhere else in the city. Most of the time I would order the mutton kottu roti, which is a spicy, meaty, plate of wonderousness. When something is that good, why stray, but at some point I started ordering a side of one of their vegetable curries. Now they have a lot of the standard ones but they also have a few special ones that they don’t make every day, so it’s a bit of a lottery if they’re going to have them on the day you decide to eat there.

My three favourites are beet, spinach, and okra. None of which are easy to replicate. I have scoured the internet for recipes for all of them and tried a few but not had the best luck. This is the closest I’ve come to Rashnaa’s beet curry and is adapted from a recipe at My New Roots. Joy factor also ratched up as the beets came out of my own garden.


One of the things that I really like is the flavour of curry leaves, which are an aromatic leaf from a citrusy tree and are completely unrelated to curry powder. They are incredibly fragrant, and not at all spicy, giving off a nutty scent when cooked. They apparently also have tremendous health benefits. You can buy curry leaves fresh and dried in most Indian and even some regular grocery stores.

Yield: 3-4 servings

Ingredients

2 – 3 medium-sized beets
1 tbsp coconut oil
1 tsp black mustard seeds
1 tsp ground coriander
20 dried or 15 fresh curry leaves
2 green chiles, finely chopped
1 stick cinnamon
1 large onion, finely chopped
3 cloves garlic, chopped
1 tsp. salt, plus more for finishing
1 cup full-fat coconut milk
juice of 1 lime
1/4 cup chopped cilantro


Peel beets and cut them into matchsticks. You might want to wear gloves for this to avoid getting bright pink hands.

In a medium-sized pot over medium-high heat, melt coconut oil. Add the mustard seeds, stirring constantly until they start to pop. Quickly add the coriander, curry leaves, chiles, and cinnamon, stir well, and fry for a minute.

Add the onion and saute until they are translucent, about 5 minutes. Add garlic and saute for another minute.

Add beets, salt, and coconut milk, bring to a simmer, reduce heat low and cover. Simmer gently so the coconut milk doesn’t split, for about 20 minutes until the beets are fork tender.

Once the beets are done, turn off the heat and stir in the lime juice. Check your salt levels and then gently fold in the cilantro.

Serve hot with rice and any other vegetable curries you might like.


The beautiful beet curry along with a chicken in onion gravy, smoked eggplant and herbs, and a mushroom curry.

Thursday, 11 August 2016

Potato salad with creamy roasted poblano dressing


Harvest time is prime time. Even from my small urban garden, the ripening of the vines of tomatoes, peppers, and other vegetables and herbs is cause for much annual excitement and creativity.

Every year, I plant a selection of heirloom tomatoes – thanks to the seeding efforts of others much more skilled at this than I – as well as a few other things I want to try out. Space and direct sun are pretty scarce around my house so the vegetable garden is set right up on the sidewalk, where, I’m happy to report, neighbours and others are kind enough not to pilfer my produce!

The last few years, my little plot has included poblano peppers, those shiny, dark green Mexican pods that deliver what I consider one of the greatest flavours on earth: slightly smoky, fresh, a bit of heat, and a great colour!


In this recipe, all the herbs, poblanos, and the knob onion come from right outside my front door. That’s 100-foot eating if you’re counting! The salad is also best with some of the unique potatoes you can get from your local farmers’ market or that you may grow in your own garden (maybe I’ll do that next year).

The dressing is creamy but light and fresh; not cloying like many the many mayonnaise-based potato salads I am not a fan of.

And, of course, summer is the time for eating outside and grilling things on the bbq. This salad goes great with carne asada, grilled steak tacos, or pretty much anything else cooked over a flame!


Yield: 4 servings

Ingredients:


1 large poblano pepper
2 pounds potatoes
1 knob onion or a couple of green onions

Dressing:
1/4 cup plain, low-fat greek yogurt
1/2 roasted poblano pepper (you only need 1 pepper in total for the salad and dressing)
1/2 tsp smoked paprika
1 tbsp olive oil
1 garlic clove roasted
2 tbsp chopped chives
2 tbsp chopped cilantro
2 tbsp chopped parsley
juice of half a lime
salt and pepper

Roast the poblanos. If you have a bbq or gas stove, char the skin over the flame. If you have an electric stove, put it under the broiler for 10-15 minutes turning it so all sides get charred. (Get your little garlic clove into this action as well to roast and sweeten it up).

Put the hot peppers in a bowl, cover them with a tea towel, and let them sit/steam for 10 minutes or more. The skin should now come off easily when you rub it. Remove as much of the skin as you can then cut out the stem and seed. Rinse it to get all the black stuff off and remove the final few stubborn seeds.

Then roughly slice or chop half of the poblano to use for the dressing and more finely chop the other half to use directly in the salad.


To make the dressing, put the roughly chopped poblano half as well as all the other ingredients into a blender or food processor and waz it up. Check for salt. It should be a pleasingly light green, fresh, smooth dressing. Personally, I could just eat this dressing straight up, it’s so amazing.

Meanwhile, cut the potatoes into one-inch cubes and boil until fork tender in salted water. Drain.

Place the hot potatoes in a bowl with the finely chopped poblano and green onion. Dress the potatoes while they’re still hot as it really helps them absorb all the gorgeous flavour. You can eat it warm or refrigerate for a couple of hours if you prefer it cold.

Marinated flank steak quickly seared on the bbq with the creamy poblano potato salad and "solar flare" heirloom tomatoes: summer eating at its best.

6 Weight Watcher smart points per serving (using less olive oil will bring your points down a bit)

© Gail J. Cohen 2016

Monday, 8 August 2016

Salsa verde: once you go green there's no going back

Salsa verde can mean a lot of different things from a totally fresh sauce to one much more complex. This version of Mexican salsa verde is tomtaillo-based and has become one of my favourites.  Of course, it was the very first dish that was prepared for me when I arrived in Oaxaca last year. So simple and so mind blowing. Enjoy it, over and over again.


Yield: 2 cups

Ingredients:

1 lb tomatillos husked and washed
2 tbsp chopped fresh cilantro
2 garlic cloves with skin still on
½ white onion sliced
1 fresh jalapeno or serrano chile
Juice of ½ a lime
2 tsp of oil

Dry roast the tomatillos, garlic, chiles, and onions on a comal or in a large non-stick frying pan. Once the garlic is blackend, take it off the comal and cool it, then peel and put it in a blender.

You can definitely use canned tomatillos for this. It doesn't have quite the same fresh flavour but it works and you don't need to roast them, just toss in the blender and keep going.

Add all the other ingredients to the blender and blend it all until smooth, about 2-3 minutes. If it’s very thick, add a bit of water to thin but don’t make it too thin.

Heat the oil in a pot and once it’s very hot, pour the tomatillo mixture into the pot so it sizzles. Stir and boil for a couple of minutes and then it’s ready to use in any variety of delicious ways.


Good tasting isn't always good looking when it comes to food!
The most simple dish involves dry frying a couple of corn tortillas, daubing some salsa on a plate, then layering salsa and tortillas, and toppping with some queso fresco and sliced avocado or guacamole . Makes a great breakfast. Add a soft fried egg and now you’ve some perfection. We probably eat this for a light dinner even more often than breakfast.

For a bit more of a substantial meal, you can poach or grill some chicken and serve it with rice, avocado and a bit of salad.


© 2016 Gail J. Cohen

Tuesday, 17 May 2016

Red, red soup

I don't know why but I was thinking of this recipe today so I've reached back in time to bring it back.

From the archives

At one point in time, I used to eat a lot of borsht but it was always the stuff in the bottles and it was farily purple. I loved it. I dreamed up this easy recipe tonight to use up some of the beets in the fridge. Traditionally it's made with cabbage but my body doesn't agree with it very well so I left it out.  It should be served with a dollop of sour cream but I didn't have any. No matter, it was super delicious.

Ingredients
1 large beet, 2 medium, or 4 small - peeled and grated
1 large carrot - peeled and grated
1 medium potato - peeled and grated
1 stick of celery - finely sliced
1/2 an onion - finely sliced
2 cloves of garlic - crushed
4-6 cups of beef broth
juice of about a half of a lemon
1 tbsp dried dill
salt and pepper to taste

Basically you throw everything into a pot of boiling broth and let it cook for half an hour. Serve and eat. You can obviously drop in a tablespoon of sour cream, but you really don't need it.

Nutritious and delicious. And it's a great colour. The picture does not do it justice.


(c) Gail J. Cohen 2013

Sunday, 15 May 2016

Carne asada en adobe de guajillo


My friend Sarah recently returned from Arizona with a couple of bags of chiles in tow; keen to use them but not really sure what to do with them. So I offered to help. If you have a “I want to make things with chiles but don’t really know where to turn” emergency, I’m you’re gal. So we set a date for some Mexican cooking basic training and I set out figuring out something delicious to do with either cascabel or guajillo chiles.

I particularly enjoy guajillos because they have a beautiful deep red colour as well as a lovely fruity flavour without too much heat. Quite often people are afraid of cooking with chiles because they don’t want to eat spicy foods but the beauty of many Mexican chiles is that they’re not crazy hot but deliver a delightful flavour punch.

If you’re ready for some great grilling, this marinade is absolutely spectacular and worth making over and over again on the BBQ this summer (and also winter if you’re anything like me.)

Ingredients:

2 pounds flank or skirt steak

Marinade:

4 dried guajillo chiles
2 cloves of garlic
1/4 tsp ground cumin
1 tbsp cider vinegar
pinch of salt
pinch of sugar

Boil up some water. Stem and seed the guajillo chiles. Soften them slightly on a comal or in a non-stick frying pan. Just heat them for a few minutes on each side until they are soft, don’t burn the flesh because it’ll make your sauce bitter. Put the chiles in a glass bowl, cover with boiled water, and let sit for about 15 minutes or so. Dry roast the garlic (with the skins still on) also in the pan or on the comal.

Once blackened, let the garlic cloves cool then peel and toss them into a blender along with the reconstituted chiles, vinegar, salt, sugar, cumin, and a 1/4 cup or so of the chile liquid. Waz it up until you get a really great smooth paste. If it’s too thick, just add a bit more water.


Take the steak and cut it into two pieces then put it in a non-reactive (preferably glass) plate and smother the meat with the marinade. You want every bit covered in it. Cover and put it in the fridge to marinate for at least four hours but better for eight or so.

When ready to cook, heat the grill until it is super hot. Put the meat on and sear each side for 8 or so minutes. Then flip it a couple of times to finish it off. Make sure you use up all the delicious marinade during the cooking process. Remove it from the heat and let it sit for about 10 minutes, then slice thinly and serve in a taco or over rice.

And why not grill up some shrimp along with it! They are great with salsa verde or marinated in lime and garlic.

© Gail J. Cohen 2016


Saturday, 5 March 2016

Chile powder

My love of chiles knows no bounds, so I'm always looking for different things to do with them. The reality is, though, that you can't cook every meal with chiles because the people you live with might not be quite as in love with them as you are. That doesn't mean my mind isn't always thinking about things to cook and ways to use all the beautiful chiles Mexico has to offer.


The most recent round of chile idea generation was spakred by my friend Sarah, who recently went to Arizona and came home with a big bag of cascabels. Cascabels are cutie little chiles - they look like big cherries, but, you know, with a bit of a kick. Unlike many chiles, the cascabels don't flatten out when they dry. Literally cascabel translates to "rattle" as the seed inside rattle around when the chile is dried and you shake it all about. The Gourmet Sleuth describes cascabels as "moderately hot and have a nutty flavor with a rich tannic and slightly smoky nuance."

While Taco Tuesday has become quite the thing, I am all about Taco Everyday. So I figured I'd try making some chile powder to make tacos later. This is what I whipped up it's still making my nose tickle hours later.


Yield: 2-3 tablespoons

Ingredients

2 dried cascabel chiles
2 dried chiles morito (chipotles)
2 dried cayenne peppers (I grew these in my garden last summer)
1 tsp dried cumin
1 tbsp Mexican oregano
1 tsp garlic powder
1 tsp dried coriander

Deseed the chiles. Then add all the ingredients to a grinder - I have a coffee grinder that I use only for spices. Grind it all up until it's a fine powder.

Use it as you would any chile powder.

(c) 2016 Gail J Cohen

*********

With this, I made some tasty beef taco. Just took 3 teaspoons of the chile powder, 1 pound of ground beef, 1 chopped/sauted onions, and a tablespoon of tomato paste and cook it all up for 20 minutes or so.  Then add the fixings and it's  Taco Saturday Night!


Monday, 26 October 2015

Tamales!


They are crazy for tamales in Oaxaca. I thought tamales were mostly made for festivals because they take forever but here they eat them all the time - stuffed with moles, veg, chicken, etc. I have probably eaten tamales at least every second day since arriving. 

While I am in Oaxaca, I am staying with a family along with three other students from my language school. The four of us, along with the family of five, plus a dog and cute puppy make for a big household. Although the house is big and the students all have rooms with an ensuite (mini) bathroom to ourselves. While here, we get breakfast as well as the choice  of having our main meal. There's also a little restaurant in the garage that pops up every night. So there's cooking going on around here.  So I asked my host Eunice the other day if I could cook tamales with them one day and today was the day.

After lunch at 3, I hung around in the kitchen and tamale making started. Usually tamales are wrapped in either dried corn husks or banana leaves. Today, we used swiss chard, which was really awesome.

The tamales were pretty basic and easy to make, as tamales go.

Eunice showing me how the pros do it; the salsa, and the wrapped tamales getting ready for a steam.


The stuffing was thin slices of jalapenos (rajas de jalapeno), tons of onion, and tomato and shredded chicken. That's it. Basically cook it up into a salsa. In order to use it for the stuffing, just scoop some out of the pan and strain it so you don't get all the sauce, then add some chicken and that's it.

The masa (corn meal mixture) that is used for tamales is really hard to replicate back home but you can do a decent approximation using the pre-packaged masa that's available in lots of stores. Here's it's fresh and therefore much lighter and smoother. To the masa, which you can buy around the corner from pretty much anywhere, you add quite a bit of fat which makes the batter rich, and a few teaspoons of baking powder. 

Roll the masa into little balls, then turn those into a little cup, fill with salsa and chicken, seal them up, then wrap in the swiss chard. Then you just steam them until they're ready. In a pressure cooker it takes less time but in a regular pot, steaming would take about an hour and half. 

Once they're ready, simply serve with a bit of the salsa with juice as well as a bit of crema and crumbled queso fresco. Easy, peasy (and no messing around with unwrapping steaming hot leaves or corn husks!)

During the whole affair, I was chatting away in Spanish with Eunice, who told me my Spanish was pretty good. Her mom even said she understood most of what I was saying. So the whole Spanish lesson thing seems to be paying off. Maybe by the end of all this I'll be able to read and understand those kids books I bought at the book fair in the zocalo last night.

Saturday, 24 October 2015

The cooking show

First cooking class was today and I ended up being the only one in the class so it was essentially a private course and got to pick exactly what I wanted. Things started off brilliantly when I arrived and was offered coffee or chocolate. I had chocolate and it was brought to me steaming in a huge bowl with a side of sweet bread and hibuscus preserve. Dip that baby into the chocolate and you've arrived in heaven.

The class began with cleaning and preparing corn to make tortillas. We then stuck it in a bucket and headed out to a local "molino" — essentially a place where you bring stuff (corn, mole ingredients, chiles, chocolate, beans) and they grind it for you. In our case from the corn came masa, ground superfinely.

We continued with a trip to the neighbourhood market, Sanchez Pasquas, where I learned much about local herbs, fruits, and more. Most of that info has promptly been forgotton because I wasn't taking notes. I will say that there is lots of green stuff I can't buy at home. I am most sad about avocado leaves. This little market was pretty much only food and was a lot less busy, shall we say, than the big markets near the centre of town. We bought a bunch of ingredients for our class like cheese and squash blossoms, as well as these local plums that I had never seen and we used to make aqua fresca (basically sweet fruit water). Also discovered a new kind of basil here, that has a really sweet, lovely scent to it and which is not used at all for cooking but for "guarding" your business and also as a body cleanser.

Grinding the corn and making the tortillas. The ones on the bottom are the flavoured ones.

Back at Casa Crespo, we made three kinds of tortillas with our masa: plain, with plantain, and squash blossom and epazote (a widely used herb in Mexican cooking that is delicious cooked but smells like diesel fuel when raw).

Also three kinds of basic tomato salsa, well one salsa with two additions to make different flavours: cumin and avocado leaves. The latter was my favourite and I'm going to have to try to bring some dried ones home.

The first course was the plain tortillas with quesillo, the Oaxacan string cheese, and my salsas.

Tortillas con quesilla y salsa, ceviche, the local plums, and making rose petal ice cream. 

I had also opted to make ceviche, since I never have, so we made a version that was simply white fish (I didn't ask what kind) along with pickled chiles, olives, capers, onions, and tomatoes. Topped with a few slices of avocado it was totally spectacular.

Luckily that course was quite light because the squash blossom soup was rich, rich, rich.  We used an ear of corn, tons of squash blossoms, mushrooms, and a little squash with some onion, a fair amount of milk and a bit of cream but the thick double-cream type cream.  What I really noticed was when sauteeing everything in butter that it smelled very sweet. I took a small taste of the fresh butter and it was like nothing I've ever tasted before. Fresh, sweet, creamy but with a particular flavour that I suppose is due entirely to the cows and the terrain from which it comes. 

Squash blossoms (flores de calabaza) that became a rich soup.

The main course I chose was not one of the seven "official moles" of Oaxaca but one the chef called mole de fiesta, obviously served for holidays and festivals and the one he said he would be making in the restaurant next week for Day of the Dead. It had many ingredients: onions, tomatoes, pecans, almonds, raisins, guajillo and ancho chiles, plantain, oregano, chocolate, allspice, garlic, and cloves. Unlike many that I've made, this mole starts with frying most of the ingredients in oil (rather than dry roasting). It makes it very rich. I'm sure given more time to sit around the flavours would deepen dramatically but even after the short hour of cooking it had, it was really quite amazing. I had it served with poached chicken.

The ingreadients for mole de fiesta and the final product. 
Then last but not least on this eating fest, we made ice cream and since I'd never had it decided to go with rose petal ice cream rather than Oaxacan chocolate. It was also a taste sensation but probably one of those things that you'll either really like or dislike. Again, the bonus of being the only one in the class was I didn't have to worry about whether anyone else wanted to do it.

I, of course, got to eat this giant feast after I made it, sitting solo in the chocolate room in the restaurant. We didn't make anything too crazy: ant mole or worm tacos (they are on the menu there) but it was totally worth it and really pleased to have done it.

Everyone needs a certificate of conpletion.