Tuesday 20 December 2022

Chile lime shortbread


The best of all worlds: butter, sugar, citrus, and chiles.

A lovely warm spicy glow at the end will wow family and friends.

Ingredients

½ cup + 1 tbsp of superfine (caster) sugar

2 cups flour (spoon it into the cup measure)

Zest and juice of 1 lime

1 cup soft butter

½ tsp vanilla

½ tsp salt

1 tsp sugar rush peach (or cayenne) chile powder

2 tbsp demerara sugar


Method 

Preheat oven to 360F

Cream together butter, lime zest and juice, superfine sugar, and vanilla in a bowl.

Add flour, chile powder, and salt to the butter mixture and mix until the flour is fully incorporated but not too much. The mixture should be crumbly like damp sand.

Lightly grease a square or rectangular cake pan (I use a 7”x11” pan but an 8” square works too) and line with parchment paper.

Press the dough into the pan, making sure the surface is even and its into the corners.  With a sharp knife, score into fingers, then prick the top of each finger two or three times with a fork. Sprinkle the demerara sugar over top.

Bake 35-45 minutes until the edges are golden brown. You don’t want your shortbread to be brown. Remove from the oven and let cool slightly.


Invert onto a tray, then invert again onto a cooling rack (done twice so it’ll be right side up). Cut along the score lines again and then leave to cool.

OPTIONAL: At this point you can dribble some icing over the fingers. Just mix a few tablespoons of icing sugar with the juice of 1 lime and a pinch of chile powder.

Store in a sealed container.


© 2022 Gail J. Cohen

Friday 8 July 2022

Berbere Spice Mix


One of the key aspects of my ongoing chile growing adventure is to grow chiles from around the world that are integral to certain cuisines. One of my favourites so far has been the Ethiopian berbere coffee chile, which is a coffee-colour version of the standard berbere chile.  I only got a small handful from my first bush but I dried and ground them and the aroma was out of this world.

I wanted to use them to make a traditional berbere spice mixture to be used in traditional Ethiopian dishes like doro wat (spiced chicken). But finding a recipe was not that easy as there are so many with such a huge variety of ingredients. So after much searching and discussions, including with the lovely proprietors of Killo Meat Shop in Toronto where I got a number of the other traditional Ethiopian ingredients, this is my version.

Many of those traditional ingredients (*) have a variety of names, which I’ve tried to include so you can find them. If you’re lucky enough to have a large Ethiopian/Somali/Eritrian population, you should be able to find them quite easily. Many are also available in Indian/Pakistani groceries.

Makes about 1 cup


Fresh Ethiopian berbere coffee chiles from my garden


 Ingredients:

 30g whole Ethiopian berbere chiles (you want to have about 25 g of powder)

3g garlic powder

7g ground ginger

1 tbsp Bessobela (Sacred basil)*

3 g Korarima (Ethiopian cardamom)*

7 g fenugreek, whole

½ tsp Tena Adam/Rue (herb of grace)*

1 g black cumin seeds (tikur azmud or Ethiopian nigella)*

4 g Ethiopian black pepper (kundo berbere)

1 tsp salt

¼ tsp ajiwain

7 whole cloves

2 allspice berries

7 g onion powder

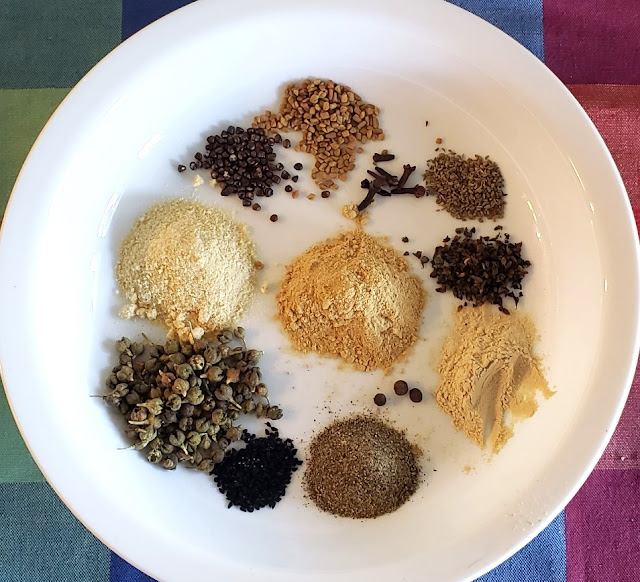
From top going clockwise: Fenugreek, cloves, ajiwain, Tena Adam, garlic powder, allspice berries, ground Kundo Berbere, Tikur Azmud, Bessobela (sacred basil), onion powder, Korerima,, and ground ginger in the middle.

Method:


If you have whole chiles: wipe clean, remove stem and seeds. Dry roast for a few minutes in an ungreased frying pan – no more than a minute on each side.  Set aside to cool.

If you only have ground chiles, then add a ½ tsp or so of smoked paprika to get that slightly smokey flavour that comes from the dry roasting.

Korerima (Ethiopian black cardamom)

Take all the whole spices (peppercorns, allspice, fennel, korerima, tikur azmud, ajiwain, cloves) and gently toast them in the dry frying pan. Just a few minutes until they turn a little brown and fragrant. Too dark and they’ll be bitter. Also set aside to cool.

Ground berbere chiles

Once cooled, grind the chiles into a powder in a spice or coffee grinder. Set aside.

Add all the cooled whole spices to the grinder and grind for a few minutes until fine.

Add the rest of the spices and herbs (sacred basil, Tena Adam, salt, onion, garlic, ginger) plus salt and waz for a few seconds until it’s all mixed.

If there’s space in the grinder, add the ground chile powder to the mix and again just waz for a few seconds to mix. If there’s not space, put the ground spices and chile powder in a bowl and give it a good stir.

Give it a good whiff so you can smell all that delicious aroma.


Store in an airtight glass container. It’ll keep super fresh for about 6 months but in reality will last a long time but lose some of its strength.


© Gail J. Cohen 2022


Friday 22 April 2022

Persian flavoured roast leg of lamb


The spice rub using Persian black limes or loomi and chiles gives this roast lamb a fantastic citrus kick.

Yield: 6-8 servings

Total time: 2-3 hours (You may need to start the day before).


Ingredients:

1 bone-in leg of lamb

4 tbsp black lime chile spice mix

¼ cup of olive oil

2 tbsp salt

2 tsp ground black pepper

1-2 cups chicken broth


For gravy

2/3 cup red wine

2 cups chicken broth

1 ½ tbsp of flour (or 2 tbsp of cake meal if making it for Passover)


Method:

If using frozen lamb, be sure to take it out with enough time to completely defrost (always best the day before).

Take lamb out of the fridge one hour before you want to start cooking. Clean and prepare it, cutting a series of slits all over the meat, which will allow the rub/marinade to penetrate it nicely.

Place the lamb on a rack in a roasting tray.


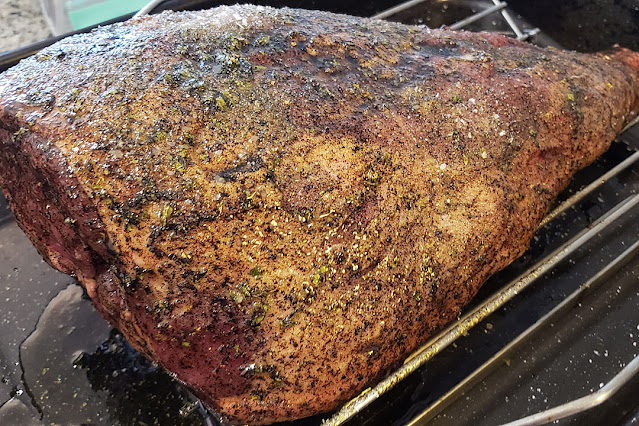
In a small bowl, combine the spice mix, olive oil, salt, and pepper together to make a wet paste. Using a basting brush, brush the lamb all over with the spicy oil, making sure you get it into those little slits as much as possible.

Leave meat to sit at room temperature and marinate for about an hour. You can cover it with foil but I don’t. (You can do this the night before and wrap it in plastic to marinate and then take it out 30 min before cooking to get to room temperature.)


Just before you’re ready to start cooking, heat the oven to 425F.

Add 1-2 cups of broth to the bottom of the roasting pan and put the meat – uncovered and fat side up – into the oven uncovered for 20 minutes. This gives a nice sear and keeps the roast moist.

Reduce oven temperature to 325F and roast a until a thermometer inserted into thickest part of flesh near the bone reaches 135F (medium-rare) or 140F (medium), 60-90 minutes depending on the size of the roast.  While cooking, continue checking the liquid in the bottom of the pan and add water or broth to make sure it doesn’t dry out.

Remove pan from the oven, remove rack from the pan, and let the roast rest on the rack for at least 15 to 20 minutes, tented with foil. The internal temperature will rise to about 145F-150F.

To make the gravy, take the roasting pan and put it across 2 burners on the stove over medium-high heat. Whisk together the flour and about ½ cup of chicken broth in a glass. Add wine to the drippings in the pan and scrape up all the brown bits from the edge. Add about a cup of chicken broth and stir all together then add the flour/broth mixture. Stir to make sure all the parts are combined and bring to the boil. Let simmer until thickened for about 3-5 minutes. If it’s too thick add a bit of broth or water and if not thick enough let simmer a bit longer. Add any extra juices from the resting lamb and mix together before removing from the heat. Taste and season. Decant into a bowl or gravy boat.

Carve lamb. Serve with delicious gravy. Be thrilled about discovering the wonderful flavour of the black lime. 

Roast potatoes or any other roast veg are a great accompaniment for this dish.


©️ Gail J. Cohen 2022

Black lime chile spice mix


A mainstay of Persian cooking, black limes (aka noomi basra; limoo amani; and loomi)  are fresh limes blanched in salt water (which means they are briefly scalded in boiling water before being plunged into freezing water) and left to dry until they're rock hard, resulting in golf size, brown to black coloured balls with a brittle texture that easily yields itself to a grinder.  You can find them in most Middle Eastern grocery stores.

They are traditionally used whole to flavour stews and spices. I created this rub because I wanted to take advantage of the funky citrus flavour but to use on roasted and bbq meats.

I used dried sugar rush peach chiles because they are my favourite and I have a lot of them but you can use a medium chile powder or any other dried chiles instead depending on the heat you prefer. If using super hot chiles, I’d just use one.

Yield: about ¾ cup

Ingredients

4 dried black limes (aka limoo aman or noomi basra)

3 dried sugar rush peach chiles (or 1-2 tsp chile powder)

2 tsp garlic powder

2 tsp dried parsley

1 tsp dried mint

¼ tsp ground cinnamon

½ tsp ground turmeric

Method:

If using whole dried chiles, remove the stems of the chiles and grind to a fine powder in a spice or coffee grinder. Put into a small non-reactive bowl.


Crack open the black limes – I used a small kitchen mallet – and remove any seeds. Grind the limes to a fine powder. Add to the chile powder in bowl.

Add all the other ingredients to the bowl. I tend to grind spices as needed so cinnamon was also ground and parsley and mint crushed from whole before adding to the bowl.

Mix it all together and store in an airtight glass container. Store in a cool dry place and it should retain its potency for a few months.

Great as a rub on roasts or grilled meats – just add a few tablespoons to some olive oil and rub on the meat.

Also a great addition to soups, stews, and even popcorn.


 ©️ Gail J. Cohen 2022

Tuesday 22 February 2022

Fermented hot sauce made with a brine/mash combo


FOR THE FERMENTING

Needed:

1 large STERILIZED mason jar + lid/elastic + piece of clean fabric big enough to go cover the top.

 400 grams of fresh chiles (any combo you like depending on the heat level you’re looking for). I usually make it with mostly medium heat chiles with a couple of super hots (habanero, fatalii, reaper) thrown in for good measure. You can also use a combo that includes some sweet peppers (say you’ve got only tiny aji charipita or only super hots – the sweet peppers bulk it out and add colour)

Garlic/Carrot/Berries/Other fruits etc.   if you want

1 Litre of filtered/uncholorinated water at room temperature

30g/3 tbsp of fine sea salt

How to:

Combine water and salt, making sure it all dissolves.

Stem and deseed the chiles. You can keep some seeds if you want a bit more heat. USE GLOVES and maybe even a mask and goggles to do this. 

Put chiles and garlic (and other ingredients if you’re using them) into a food processor and waz them up to a coarse puree.

Transfer the mash to a 1 litre mason jar making sure to leave an about 5 cm at the top. Tap the jar lightly to remove any air pockets.

Fill with brine and make sure the mash is covered. It tends to float to the top, so either use a fermenting weight in the top or take a small Ziploc bag and fill it with water (getting all the air out) and stuff it in the top of the jar so it pushes the mash down.


Cover with the piece of cloth using either the lid rid or an elastic band. If you have an airlock lid or other fermenting lid, then use that but you don’t really need one. The cloth lets it breathe. You can also just use a regular lid and burp it every day so the gas can escape.

Put a label on the jar that lets you know which chiles are in it as well as the date it was started.

Store the jar somewhere cool and dark. I usually put it in the basement laundry. Fermenting will take about two weeks but check up on it every day. The brine will start to go very cloudy I usually make a second batch of brine and fill up the jar if the chiles aren’t totally covered. You’ll definitely be smelling it.

(Measure for pH with a good pH meter to ensure the brine is below 4.6. This is the pH at which botulinum toxin can no longer form and is a good minimum acidity to target. Lots more details about fermenting, pH levels etc here.)

Note on kahm yeast (or that white stuff that you might see floating on the top of your ferment): It’s not harmful to eat but best to remove it when you see it. Scrape any visible yeast off of the top of your ferment with a clean utensil as soon as you see it form. Once it forms it usually continues to grow. Watch your contaminated ferment very closely and continue to clean away yeast everyday if needed. You many need to add more fresh brine to make sure your chiles are covered.

You can ferment for longer than two weeks to give it more of that funky/sour fermented flavour. You can leave it as long as you like as long as it doesn’t spoil or get moldy. I usually do about three weeks and then make sauce or pop them in the fridge for a few months.

MAKING THE SAUCE

Needed:

Bottles for putting the sauce in.

·       Woozy/sauce bottles – I like the 5 oz ones

·       Any other glass container you can find in any size.

·       Just be sure to sterilize all jars and lids with boiling water for at least 10 minutes before using them.

Small stainless steel funnel (it needs to be able to fit into the top of your sauce bottles)

Additional ingredients:

If you didn’t put garlic or fruit into your ferment, add them now. I use 2-3 cloves of garlic for 1 mason jar full of chile mash

1 tbsp honey

¾ cup cider vinegar

¼ cup water

Method:

Drain the chiles through a fine strainer, reserving the brine

Put drained chiles, ¾ of the brine, vinegar, honey, water and any other ingredients into the blender and waz it up until it’s very smooth. Maybe 2-3.  If it’s still very thick add a bit more of any of the liquids (brine will make it saltier, vinegar will make it more sour, water will just thin it).


Pour it into a stainless steel pot and bring to the boil. Reduce heat and let simmer for 15 minutes.

If you want a fairly runny sauce, you can strain this sauce but if you like it a bit thicker, just use as is.

Let the sauce cool a little, then pour it into a something with a spout so it will be easier to decant into the bottles. I just use a large glass measuring jug.

Using your funnels to avoid a mess, pour the hot sauce into the bottles. Seal them up. Put some pretty labels on and you’re good to go!


 ©️ Gail J. Cohen 2022

Wednesday 22 September 2021

Tomato Tart with Puff Pastry


This tart is a great way to use some of the beautiful and colourful heirloom tomatoes that you grow in your garden. And it uses store-bought puff pastry because it’s just so easy. 

** Making this doesn’t take a lot of time but you do have to do a couple of steps in advance to make sure your tart pastry isn’t soggy, so please read the instructions through in advance. **

Yield: Lunch for 4, appetizer for more

Ingredients:

4-5 medium tomatoes, thinly sliced

7-10 cherry tomatoes, sliced

1-2 tbsp chopped fresh herbs (any combo: thyme, basil, tarragon, parsley, oregano etc but must be fresh)

2 tbsp Dijon mustard

1 tsp butter

3 tsp milk

1 sheet frozen puff pastry (defrosted overnight in fridge)

1 ½ cups grated sharp cheese (gruyere is best)

Salt & pepper

Olive oil

Method: 

Defrost pastry overnight in the fridge. **

Thinly slice tomatoes and spread out in a single layer on a cutting board or two. Cover with paper towel to absorb the liquid. You will probably have to do this twice at least so give it a couple of hours. Having dry-ish tomatoes means your tart pastry won’t be soggy. **

Preheat oven to 400 F

Cover a large baking sheet with parchment paper.

Unroll the defrosted pastry on to the parchment and stretch it out a little bit.  With a sharp knife, score the pastry ½” or 1.5 cm inside the edge all the way around, making sure you don’t cut through the pastry.

Inside the score line, poke the pastry all over with a fork. Cover the inside area with a thin layer of Dijon mustard.


Melt the butter in a small bowl and add the milk. Brush the mixture over the scored edge of the pastry. This will help it to brown up a bit. Put the prepared pastry into the over to brown for about 15 minutes.

Remove pastry from the oven and press down with a fork any of the inside area that is puffy.

Spread cheese in thin layer across the bottom of the pastry. Then lay the tomatoes in a single layer (make it pretty!) from edge to edge on the inside section of the pastry.

Sprinkle with a bit of salt and the chopped herbs. Drizzle with a little bit of olive oil and fresh ground pepper if you like.


Put that gorgeous baby in to the oven for about 25 minutes (don’t let the crust get too brown on the edges) et voila!

Remove from the over and let cool. This tart is delicious both warm and at room temperature so it can be made a few hours ahead.


 ©️ Gail J. Cohen 2021


Friday 30 October 2020

Chocolate-tinged red enchilada sauce


 This recipe makes a pretty traditional Mexican red enchilada sauce but the addition of some dark chocolate (I used the fantastic organic sea salt chocolate from Canadian chocolate company Xauxa) gives it a little more richness and depth.

Yield: 4 cups

Ingredients:

8 ancho chiles
2 pasilla chiles
3 guajillo chiles
1 medium onion quartered
2 plum or 1 large tomato
3 cloves garlic (skin on)
1/2 tsp Mexican oregano
1/2 tsp marjoram
3 tbsp canola or avocado oil
20 g Xuaxa sea salt dark chocolate, chopped
salt to taste

Method:

Wipe chiles clean and remove stems and seeds. Dry roast them in a hot pan or on a comal (no oil) for about 10 or 15 seconds each side. Don’t let them burn or your sauce will be bitter.  Soak chiles in a bowl of boiled water for about 20 minutes to soften.

Roast the onion, tomatoes, and garlic in the pan or on comal. Let the garlic cool and remove the skin.

Put the soaked chiles, onion, tomatoes, garlic, oregano and marjoram into a blender. (Save the chile soaking water). Blend all of it until smooth, about 3 minutes. It’ll feel like it’s a very long time but your patience will pay off with a silky smooth sauce. If sauce seems too thick add a small amount of the chile soaking water.


Heat two tablespoons of cooking oil in a medium sized pot.  Pour the sauce into the pot to fry it (be careful of potential spitting as the liquid hits the hot oil). Add the chopped chocolate and stir it into the sauce. Reduce the heat and simmer for 30 minutes until the sauce has thickened. It will also turn a deeper shade of red. Check and stir occasionally to make sure it doesn’t stick. The sauce is ready when it coats the back of a spoon.

Add salt to taste.

Allow the sauce to sit for at least 2 hours so that the flavours can marry.

Once your sauce is ready, use it to make your favourite enchiladas rojos. I pretty much guarantee no matter how you choose to make your enchilada that this sauce will be better than most. It will keep in the fridge for about 5 days or freeze it for use anytime.

 © Gail J Cohen 2020